Objective
We have a wide range of Kubernetes clusters running development, staging, and production workloads. One of the primary components of these clusters is the Container Network Interface (CNI) plugin. This provides networking to your cluster and allows traffic to flow in and out of it.
Kubernetes purposely does not come with this networking layer to allow us, the cluster operators, to choose the CNI plugin that has the appropriate feature set that best fits our workload. There’s a huge amount of variety in what’s out there and since this is a critical layer in your cluster stack, whatever you choose tends to become very sticky. As in, it’s hard to replace a cluster CNI plugin unless you’re comfortable redeploying the whole cluster. We’ll talk a bit later in this post about the different options we considered and what we ended up doing (and how!).
The end goal basically boiled down to this: we want to switch the CNI plugin from Calico to Cilium in all of our clusters. Ideally, this is transparent to our tenants and their workloads should continue to work while we do this.
Sounds easy enough! You just delete Calico, and apply the Cilium manifests! Well.. That’s basically right, except, with a couple more steps
Purpose
We won’t dive much into the pros and cons of these two CNI plugins as this is discussed in many posts, has a number of videos/talks about it, and ultimately, each project will try to convince you that they’re better than the rest. The reality is, the landscape changes drastically year-to-year, month-to-month and even release-to-release! The beauty of the open source community and the focus on interface standards for Kubernetes such as CNI, CRI (container runtime interface), CSI (container storage interface), is that you should be able to run whatever project you want, so long as it’s compliant with these standards. Plug-n-play!
The other reality is that your requirements change as your adoption grows and your end-users’ demands grow. Something that worked before doesn’t necessarily mean that it will work the same way forever. Whether it’s due to scaling, or the underlying networking technologies (IP tables vs. eBPF), or any of the other many, many features that a project can offer, we should be able to swap things out to our hearts’ (and budgets’) content.
There are a number of features offered by the Cilium plugin that we wanted to explore and use. This includes Hubble for networking and security observability platform as well as using Cilium’s implementation of the Kubernetes Gateway API.
Let’s look at the different ways that we could do this. If you want us to just get on with it, skip down to how we did it!
Different Methods Attempted
We identified 4 different paths to making this migration happen:
- Rip out the old, deploy the new
- Deploy new clusters that come freshly made with Cilium
- Bind multiple network interfaces to a pod
- Attempt a hybrid, per-node migration
Spoiler alert, we ended up going with option 4. Skip ahead to the next section to get an outline of our steps, but if you want to hear about our journey, then keep on reading. We think failure is interesting and it’s not always rainbows and butterflies.
Rip out the old, deploy the new
This is probably the easiest one to try and attempt, mainly because it’s easy to do, but this approach can be very disruptive to the workload running on the platform. In this approach, we would have a big cluster-wide maintenance window where access to the clusters and the workloads on top would be disrupted until the migration is done. It essentially boils down to removing the Calico Helm chart and all its components, and then try to deploy the Cilium chart and all its components. If anything went wrong, it’s hard to revert back especially if some applications start to work and some don’t.
Also, while development and staging clusters are probably fine if they are down for a couple of hours or days, it’s just not feasible to do with a production cluster that’s running revenue-generating workloads. As with any big problem, it’s always better to break it down into smaller pieces than to do it all at the same time. One thing we knew early on in the process is that we’ll need to do this migration on a cluster-by-cluster basis. Could we break it down further? Node group by node group? Pod by pod? How much slicing and dicing is too much slicing and dicing?
Let’s see if we have a better option.
Deploy new clusters that come freshly made with Cilium
The next easiest option, if you are a platform/infrastructure engineer, is to just deploy a new cluster that configures Cilium as the CNI right from the get-go. We spin up new clusters all the time and have proper tooling to quickly stand up the infrastructure, deploy our new cluster, and then deploy all our critical tools. However, this is very cumbersome and labour-intensive for our end users and tenants. They now need to schedule a migration of all their applications, data, tooling, along with everything else that they are delivering, in order to get on this new platform.
Tenants will reasonably wonder why are they forced to do this migration? The initial offering of Cilium on our clusters wouldn’t bring any new perceived value to them. We want to achieve feature parity first, and then start enabling new and advanced features within. Do development teams who have their stuff running fine already really need to worry about iptables vs. eBPF? Do they care? We didn’t think so. At least not yet.
If we absolutely had no other way, this is probably the cleanest method and the best way to clear up some tech debt, but we wanted to avoid this method as much as possible.
Bind multiple network interfaces to a pod
We began this initiative at the beginning of 2023, and fully completed the migration early 2024. While researching our approaches early on in this process, Cilium’s per-node configuration feature had not been released yet. We will dive into that in the next section, when we talk about how we actually ended up doing the migration thanks to Cilium v1.13 and, specifically, that feature.
However back when we got started, we came across this article from Cilium which pointed to this external blog post. A live Kubernetes CNI migration with no downtime? Count us in.
In a typical Kubernetes cluster, a pod would get only one networking interface where traffic ingresses and egresses from. A CNI facilitates the creation and management of this interface to the pod. So that’s what a single CNI can do, what about two?
This is where Multus comes in. Multus is a CNI plugin that allows multiple network interfaces to attach to a pod. This is possible through Multus by combining multiple CNIs to work under this “meta-plugin”. In theory, the approach would have been like this:
- Deploy Cilium manifests (latest 1.10 in our case)
- Deploy the ConfigMap for Multus, which will contain both the Calico and Cilium configurations, the end result being a single file
00-multus.conf - Deploy Multus DaemonSet and RBAC manifests
- Begin restarting workloads so they can have both network interfaces on there, with Calico being the primary networking provider
- Test connectivity and reachability of the pods across both interfaces
- Update the configuration to have Cilium be the primary CNI
- Restart workloads such that Cilium becomes the primary
- Remove Calico remnants
- Relabel the node such that Cilium is the only CNI
- Restart workloads again to pick up the new CNI configuration
- Remove Multus components
This image, pulled from the original guest blog post, shows the general steps on how this would have worked:
This is what the ConfigMap for the default CNI network under Multus looked like, with Calico as primary:
kind: ConfigMap
apiVersion: v1
metadata:
  name: multus-cni-config
  namespace: kube-system
  labels:
    tier: node
    app: multus
data:
  cni-conf.json: |
    {
      "cniVersion": "0.3.1",
      "name": "multus-cni-network",
      "type": "multus",
      "capabilities": {
        "portMappings": true
      },
      "delegates": [
        {
          "cniVersion": "0.3.1",
          "name": "default-cni-network",
          "plugins": [
            {
              "type": "calico",
              "log_level": "WARNING",
              "log_file_path": "/var/log/calico/cni/cni.log",
              "datastore_type": "kubernetes",
              "mtu": 8800,
              "delegate": {
                "isDefaultGateway": true
              },
              "ipam": {
                  "type": "calico-ipam"
              },
              "policy": {
                  "type": "k8s"
              },
              "kubernetes": {
                  "kubeconfig": "/etc/cni/net.d/calico-kubeconfig"
              }
            },
            {
              "type": "portmap",
              "snat": true,
              "capabilities": {"portMappings": true}
            },
            {
              "type": "sbr"
            }
          ]
        },
        {
          "cniVersion": "0.3.1",
          "name": "cilium",
          "type": "cilium-cni",
          "enable-debug": false
        }
      ],
      "kubeconfig": "/etc/cni/net.d/multus.d/multus.kubeconfig"
    }
We were able to get to the half way point before running into issues:
- Multus was installed and was the default CNI
- Pods had both interfaces configured (one serving a Calico IP range, the other serving a Cilium IP range)
- Calico was the primary CNI
When it came time to test the connectivity however, the Calico interfaces would not reach the Cilium ones, and vice versa. This was a critical piece of the migration since these pods needed the ability to reach each other on either interfaces between steps 7 and 11. Since the workloads are not restarting all at the same time due to varying roll out strategies of the underlying services, there would be a period of time where pods fail to reach each other when the priority changed. We were able to trace down the behaviour to the sbr meta plugin: Source Based Routing. SBR is required in order to allow Cilium to correctly identify the endpoint of the source in order to not drop it. The first issue we hit was that Rancher, our container orchestration platform, did not install the necessary CNI plugins. We had to do this manually by downloading the CNI plugins from here, and moving them to the proper folder under /etc/cni/net.d.
The other, larger issue was that after SBR was enabled, whatever default routes were being installed, it was not correctly routing through the interfaces. If SBR was disabled, only Calico interfaces were able to reach one another; if SBR was enabled, only Cilium interfaces were able to reach other. We tried using this other CNI meta-plugin called cni-route-override as a final chance of a viable approach, but we could not get the proper routes to be inserted. We suspect it was because the initial product was validated against a different runtime than the one we were using.
We did learn a lot with this approach. Our rollback strategy was very sound as we were able to rollback our changes properly such that our cluster was back to its original Calico CNI and happily serving workloads. Of course, this was all done in a development/test cluster so we could have wiped it and restarted, but we wanted to ensure that we had a viable rollback plan if we experienced this in our production migration.
We also were able to build in a couple of safety steps and clarifications in our preparation:
- We temporarily updated the Rancher cluster agents running on the cluster to use
hostNetworkto maintain a connection from our Rancher Management cluster to the downstream cluster when the CNI was restarting - We had a good understanding on how the pod networking was set up and inheriting some of the configurations from the underlying host to determine its networking CNI. The name of the configs in the CNI path (
/etc/cni/net.d) is important. A configuration with a lower number (e.g.00) would take priority over one with a higher number (e.g.10). This allowed us to easily manipulate our tests and what configs we wanted to run on any node and the workloads running on it. - We were also able to learn about other Cilium configurations such as
--cni-exclusive=falsewhich prevented Cilium from fully taking over the CNI path since we had other components manipulating it (i.e. Multus and Calico)
We suspect some of these issues may have been alleviated by upgrading Calico to fix some other bugs and issues before doing the migration. However, this would have required another upgrade on our production clusters, to a component that we were planning to remove anyways. We kept it in mind in case our next approach failed.
Spoiler: it didn’t!
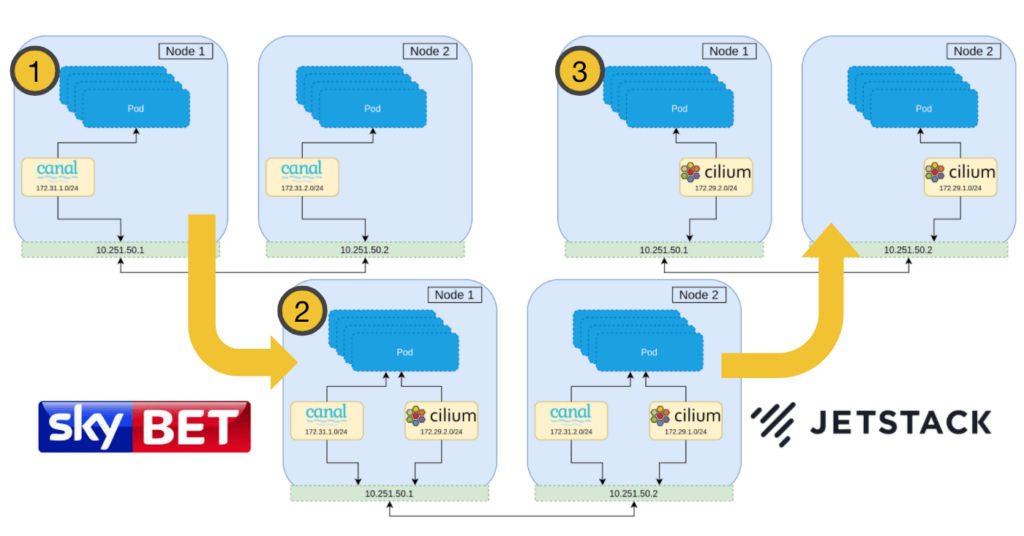
Hybrid, Per-Node Migration
While doing our investigation, we saw a new feature make it to Cilium v1.13 called the per-node configuration feature. This feature allows for setting up specific configuration on a per-node basis, based on the node’s labels. Some of its use cases are tied around enabling features that are required for specific node configurations, but it can also be used to roll out some changes gradually.
Around the same time, a blog post came out from Isovalent detailing a migration path to Cilium from other CNIs. While that post didn’t specifically do a Calico to Cilium migration, we were able to adapt some of those processes for our use case. New official Cilium docs around Migrating a cluster to Cilium also exist now. We will incorporate some of those steps in the procedure here.
The general procedure is as follows:
- Prepare the environment
- Prepare the Cilium deployment
- Deploy Cilium in the per-node configuration
- Run the migration per-node
- Set Cilium as the default CNI
- Clean up old CNI
A couple of considerations to take note of:
- Rancher is used to deploy these clusters
- We migrated both RKE1 and RKE2 clusters
- Some of our clusters ran in public cloud instances, others on baremetal
- These clusters are IPv4 only
- Calico v3.x was running on our all our clusters
- Cilium v1.13.x was our target
- Cilium’s
kube-proxy-replacementwas disabled until all our clusters were migrated
Ready? Let’s dive in!
Prepare the environment
- First, let’s install the Cilium CLI. We found that this was useful for doing some sanity tests and running some basic Cilium functionality: Cilium Quick Installation — Cilium 1.15.4 documentation
NOTE: only install the CLI. The rest of the Cilium objects will be deployed in a separate step - Check that the nodes have sufficient resources to deploy the Cilium daemonsets
- Check the node capacity (e.g. RAM, CPU)
- Ensure enough capacity is available to meet the requests and limits for the new Cilium pods
- Because of Rancher agent connections, we need to update the
cattle-cluster-agentto run onhostNetwork: trueuntil the migration is over - Update the Calico Daemonset to include the following parameter so it doesn’t try to manage the new Cilium interfaces that come up on the underlying host:
name: IP_AUTODETECTION_METHOD
value: "interface=eth.*"
NOTE: the value is dependent on the interface name pattern. In our case, the interfaces were named eth0, eth1, etc… Not doing this step correctly will result in Calico outage as it tries to reconcile the new interface - Ensure any auto-deploying pipelines or Git syncing applications (e.g. Argo CD) are disabled for Calico and/or Rancher such that your changes are not overwritten
- Deploy Goldpinger for cluster verification
Prepare the Cilium deployment
- Pick an unused CIDR range for your cluster. This will be the new Pod CIDR for pods created using Cilium. Ensure that this range won’t cause conflicts in your environment(s)
- Note: depending on your Cilium config, this CIDR may run in a VXLAN overlay network, and not need any non-NAT-based connectivity outside the cluster. If that’s the case, this CIDR doesn’t have to be unique.
- Add the new CIDR to your existing firewall policies, whether these are enforced at the Calico, the host, or the security group layer. Not allowing this can have some weird cluster and workload behaviour while the CNI is being migrated
- Check your workloads if any of them require host port services, and if so, enable the services in Cilium:
hostPort:
  enabled: true
hostServices:
enabled: true- Convert your existing Calico CNI firewall rules to Cilium.
We won’t dive into this too much because it’s extremely dependent on how your network rules are set up already. There are many resources to learn more about CiliumNetworkPolicies
Deploy Cilium in the per-node configuration
- Depending on how you plan to deploy Cilium to the cluster initially, the following Cilium settings were set using the available Helm chart:
cilium.ipam.mode="cluster-pool": allows us to set a new CIDR for the clustercilium.ipam.operator.clusterPoolIPv4PodCIDRList=["10.x.x.x/x"]: this will configure the new CIDRcilium.k8s.requireIPv4PodCIDR=true: since our clusters only use IPv4cilium.k8s.tunnelProtocol=vxlan: the encapsulation protocol that we used. This did not conflict with our existing Calico configurationcilium.hubble.metrics.serviceMonitor.enabled=false: all alerting around Cilium components were disabled to reduce noise and false positivescilium.prometheus.serviceMonitor.enabled=false: similar to abovecilium.bpf.hostLegacyRouting=true: this will allow Calico-based routing which is implemented via the host routing stack to continue providing connectivity during the migrationcilium.cni.customConf=true: this ensures Cilium doesn’t take over the/etc/cni/net.ddirectory immediately and thus, taking over as primary CNI. We will have a sample of what this custom configuration looks like.cilium.operator.unmanagedPodWatcher.restart=false: this ensures that the Cilium operator doesn’t restart pods that are not being managed by Ciliumcilium.policyEnforcementMode=never: for the time being, disable all network policies on the Cilium side so you don’t run into weird firewall issuescilium.hostFirewall.enabled=false: similar to the point abovecilium.kubeProxyReplacement=disabled: this should be disabled for the time being to reduce the number of changes going into the migrationcilium.localRedirectPolicy=true: we needed this for our dependency on public cloud metadata. More information is available herecilium.cni.chainingMode=portmap: this should be set if you have applications running in host port service. Portmap is required since we are deploying with kube-proxy-replacement disabled during the migration
- Now you’re ready to deploy Cilium! Deploy the Cilium manifests (Helm chart,
kubectl apply, etc…) - At this point, we should have both Calico and Cilium deployed to the cluster, though the cluster will continue to use Calico until we migrate all the nodes and workloads to use Cilium.
- It’s expected that the output of
cilium statuswill show 0/### of pods managed by Cilium. This will change once the nodes are migrated. - Verify service reachability via Goldpinger, and by checking other observability tools deployed for your services
- Verify that Cilium has assigned a CIDR to the Node for its internal object, called CiliumNode:
kubectl get ciliumnode - Add the CiliumNodeConfig:
apiVersion: cilium.io/v2alpha1
kind: CiliumNodeConfig
metadata:
  namespace: kube-system
  name: cilium-default
spec:
  nodeSelector:
    matchLabels:
      io.cilium.migration/cilium-default: "true"
  defaults:
    write-cni-conf-when-ready: /host/etc/cni/net.d/05-cilium.conflist
    custom-cni-conf: "false"
    cni-chaining-mode: "none"
    cni-exclusive: "true"
Whatever you choose in this block will determine the label you need in the next steps:
nodeSelector:
    matchLabels:
      io.cilium.migration/cilium-default: "true"
At this point, your cluster has two CNIs, happily working together, with service and workload reachability available cluster-wide.
Run the migration per-node
This diagram shows the general flow of the migration:
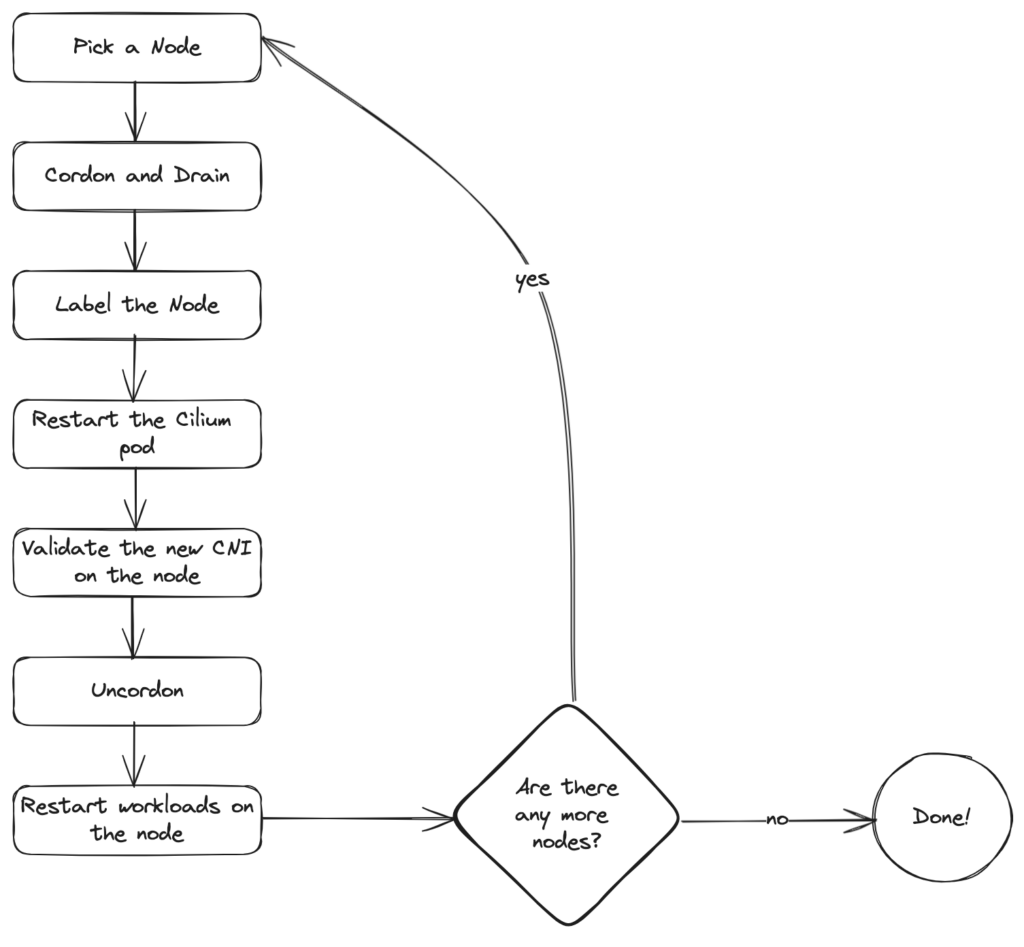
- Pick a node:
export NODE=<myNode>
NOTE: it’s recommended to leave the control plane nodes until the end - Cordon and drain the node to safely move running workloads to other nodes:
kubectl drain --ignore-daemonsets --delete-emptydir-data $NODE - Label the node to set Cilium as priority:
kubectl label node $NODE --overwrite "io.cilium.migration/cilium-default=true"
NOTE: this label should match what you deployed in yourCiliumNodeConfigobject deployed in the last section - Restart the Cilium pod on the node to deploy the updated CNI configuration:
kubectl -n kube-system delete pod --field-selector spec.nodeName=$NODE -l k8s-app=cilium --wait=false kubectl -n kube-system rollout status ds/cilium -w - Validate node migration and wait for the Cilium status to be OK:
cilium status --waitkubectl get -o wide node $NODE
NOTE: Cilium may report 0 or very few pods being managed by it at this stage, it will increase as pods get scheduled on migrated nodes. - For the first few nodes, you can also verify that Cilium configurations were set correctly by checking the underlying node’s path
/etc/cni/net.dto ensure that the directory looks like this:05-cilium.conflist10-calico.conflist.cilium_bakcalico-kubeconfig
Since the Cilium configuration is set first, it will be used for any new pods running on that node
- Uncordon the node:
kubectl uncordon $NODE - Restart all the pods running on the migrated node:
kubectl get pods --all-namespaces -o wide --field-selector spec.nodeName=$NODE | \ grep -v NAME | grep -v calico | grep -v cilium | \ awk '{print $1,$2}'| \ xargs -L 1 kubectl delete pod --grace-period=0 --wait=false $2 -n $1 cilium status
More pods should be managed by Cilium now - Validate that service reachability and Goldpinger checks are successful
- NOTE: since the node was not restarted and Calico is still running, iptable rules and ACLs should continue to protect your workloads. Always double check this behaviour against your test and development clusters to ensure that your workload is not exposed.
- It’s time to repeat this procedure until all the nodes have been migrated! As long as your application’s maximum unavailability is tolerated while migrating these nodes, you can move as many nodes as you can at the same time
Set Cilium as the default CNI
- Once all the nodes are migrated, you can now set Cilium as the default CNI
- Deploy CiliumNetworkPolicies (or Cluster-wide policies)
- Take extra caution when applying these rules, ensuring proper rules are in place to allow masters to communicate to workers, and, if applicable, to Rancher Management
- Deploy Cilium with the following settings altered from earlier:
cilium.hubble.metrics.serviceMonitor.enabled=truecilium.prometheus.serviceMonitor.enabled=truecilium.bpf.hostLegacyRouting=truecilium.cni.customConf=falsecilium.operator.unmanagedPodWatcher.restart=truecilium.policyEnforcementMode="default"cilium.hostFirewall.enabled=true
- Validate cluster health and status
- Cilium should now be the primary CNI
Clean up old CNI
- Uninstall the Calico manifests (either by
kubectl deleteorhelm uninstall) - We needed to clean up Calico iptable rules once Calico was removed. We believe this was due to the version of Calico we were running but didn’t invest too much time looking into it. The following script was created and executed by running
./calico-cleanup.sh pod
#!/bin/sh
set +x
if [ "$1" = "pod" ]; then
  if [ -z ${NODE+x} ]; then
    echo "\$NODE variable isn't set"
    exit 1
  fi
  cat <<EOF | kubectl apply -f -
$(cat calico-cleanup-pod.yml | sed "s/__CHANGEME__/$NODE/g")
EOF
  sleep 15
  kubectl exec cilium-killed-calico -n kube-system -- /bin/sh -c "`cat calico-cleanup.sh`"
  kubectl delete pod cilium-killed-calico -n kube-system
else
  echo "Flushing all the calico iptables chains in the nat table..."
  iptables-save -t nat | grep -oP '(?<!^:)cali-[^ ]+' | while read line; do iptables -t nat -F $line; done
  echo "Flushing all the calico iptables chains in the raw table..."
  iptables-save -t raw | grep -oP '(?<!^:)cali-[^ ]+' | while read line; do iptables -t raw -F $line; done
  echo "Flushing all the calico iptables chains in the mangle table..."
  iptables-save -t mangle | grep -oP '(?<!^:)cali-[^ ]+' | while read line; do iptables -t mangle -F $line; done
  echo "Flushing all the calico iptables chains in the filter table..."
  iptables-save -t filter | grep -oP '(?<!^:)cali-[^ ]+' | while read line; do iptables -t filter -F $line; done
  echo "Cleaning up calico rules from the nat table..."
  iptables-save -t nat | grep -e '--comment "cali:' | cut -c 3- | sed 's/^ *//;s/ *$//' | xargs -l1 iptables -t nat -D
  echo "Cleaning up calico rules from the raw table..."
  iptables-save -t raw | grep -e '--comment "cali:' | cut -c 3- | sed 's/^ *//;s/ *$//' | xargs -l1 iptables -t raw -D
  echo "Cleaning up calico rules from the mangle table..."
  iptables-save -t mangle | grep -e '--comment "cali:' | cut -c 3- | sed 's/^ *//;s/ *$//' | xargs -l1 iptables -t mangle -D
  echo "Cleaning up calico rules from the filter table..."
  iptables-save -t filter | grep -e '--comment "cali:' | cut -c 3- | sed 's/^ *//;s/ *$//' | xargs -l1 iptables -t filter -D
  ip route flush proto bird
fi
The manifest YAML for calico-cleanup-pod.yaml is:
apiVersion: v1
kind: Pod
metadata:
  name: cilium-killed-calico
  namespace: kube-system
spec:
  containers:
  - args:
    - -t
    - "1"
    - -m
    - -u
    - -i
    - -n
    - sleep
    - "14000"
    command:
    - nsenter
    image: docker.io/alpine:3.13
    imagePullPolicy: IfNotPresent
    name: shell
    securityContext:
      privileged: true
  dnsPolicy: ClusterFirst
  enableServiceLinks: true
  hostIPC: true
  hostNetwork: true
  hostPID: true
  nodeName: __CHANGEME__
  preemptionPolicy: PreemptLowerPriority
  priority: 2000001000
  priorityClassName: system-node-critical
  restartPolicy: Never
  securityContext: {}
  tolerations:
  - operator: Exists
NOTE: exporting $NODE will remove these rules on a specific node. Otherwise, the script will run on all nodes
- Remove old Calico CRDs:
kubectl get crd |grep calico|cut -d' ' -f1 | xargs -I{} -t kubectl delete crd {}
Closing Thoughts
It was a challenging journey to get here but it was rewarding! We learned lots during the migration process and through our failed attempts at doing it. Thanks to the availability of this feature, we were able to successfully migrate all test, development, and production clusters from Calico CNI plugin, to Cilium CNI plugin. In certain cases, we were able to move clusters as small as 3 nodes, and some that were larger than 150 nodes. In our use case, this was achieved even with Rancher as an extra cluster orchestration layer. Services remained operational and serving traffic as expected, with workloads gradually moving towards the new networking plugin.
Since the migrations were completed, we began enabling and implementing some more advanced features in Cilium. We have enabled the kube-proxy replacement, started to use Hubble for network visibility, and are starting to use Cilium’s Gateway API implementation with more features coming soon to our engineering platform.
We hope this post can help in whatever migration work you endeavour in your own environments!
References
Here’s a list of known migrations from around the community. Note that none of these were tested on our end but it could be a good gateway for further reading:
- Tutorial: How to Migrate to Cilium (Part 1) – Isovalent
- Migrate to Cilium from Amazon VPC CNI with Zero Downtime
- How Meltwater migrated from the Amazon VPC CNI plugin to Cilium in K8s
- Migrating Cilium from Legacy iptables Routing to Native eBPF Routing in Production
- How to migrate from Red Hat OpenShiftSDN/OVN-Kubernetes to Cilium
- Migration from Calico CNI to Cilium CNI in BareMetal Kubernetes Cluster and Monitoring traffic using Hubble UI
- How DB Schenker Migrated from Calico to Cilium
- How to perform a CNI Live Migration from Flannel+Calico to Cilium